#462 – Drawing a Better Looking GridSplitter

By default, a GridSplitter control is composed only of a Border element.  You can set the border’s thickness, color and background.

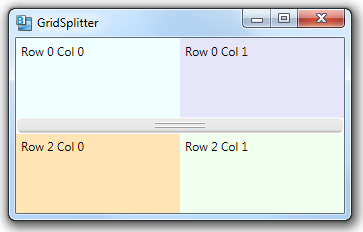
We can make the GridSplitter look a little nicer by drawing a couple horizontal lines on its surface.

We do this by overriding the default Style for the GridSplitter.

	<Window.Resources>
		<Style x:Key="GridSplitterPreviewStyle" >
			<Setter Property="Control.Template">
				<Setter.Value>
					<ControlTemplate>
						<Rectangle Fill="#80000000"/>
					</ControlTemplate>
				</Setter.Value>
			</Setter>
		</Style>
		<Style x:Key="GridSplitterStyle1" TargetType="{x:Type GridSplitter}">
			<Setter Property="Background"
                    Value="{DynamicResource {x:Static SystemColors.ControlBrushKey}}"/>
			<Setter Property="PreviewStyle" Value="{StaticResource GridSplitterPreviewStyle}"/>
			<Setter Property="Template">
				<Setter.Value>
					<ControlTemplate TargetType="{x:Type GridSplitter}">
						<Border BorderBrush="{TemplateBinding BorderBrush}"
                                BorderThickness="{TemplateBinding BorderThickness}"
                                Background="{TemplateBinding Background}"
                                CornerRadius="5">
                            <Canvas RenderOptions.EdgeMode="Aliased" UseLayoutRounding="True"
                                    Height="6" VerticalAlignment="Center"
                                    Width="50" HorizontalAlignment="Center">
                                <Line X1="0" X2="50" Y1="0" Y2="0"
                                      Stroke="White" StrokeThickness="1"/>
                                <Line X1="0" X2="50" Y1="1" Y2="1"
                                      Stroke="#A0A0A0" StrokeThickness="1"/>
                                <Line X1="0" X2="50" Y1="4" Y2="4"
                                      Stroke="White" StrokeThickness="1"/>
                                <Line X1="0" X2="50" Y1="5" Y2="5"
                                      Stroke="#A0A0A0" StrokeThickness="1"/>
                            </Canvas>
						</Border>
					</ControlTemplate>
				</Setter.Value>
			</Setter>
		</Style>
	</Window.Resources>

We also specify a gradient fill for the Background of the GridSplitter.

    <Grid>
        <Grid.RowDefinitions>
            <RowDefinition/>
            <RowDefinition Height="Auto"/>
            <RowDefinition/>
        </Grid.RowDefinitions>
        <Grid.ColumnDefinitions>
            <ColumnDefinition/>
            <ColumnDefinition/>
        </Grid.ColumnDefinitions>

        <Label Content="Row 0 Col 0" Background="Azure" Grid.Row="0" Grid.Column="0" />
        <Label Content="Row 0 Col 1" Background="Lavender" Grid.Row="0" Grid.Column="1" />
        <Label Content="Row 2 Col 0" Background="Moccasin" Grid.Row="2" Grid.Column="0" />
        <Label Content="Row 2 Col 1" Background="Honeydew" Grid.Row="2" Grid.Column="1" />

        <GridSplitter Grid.Row ="1" Grid.ColumnSpan="2" Height="16"
                      VerticalAlignment="Center" HorizontalAlignment="Stretch"
                      BorderBrush="White" BorderThickness="1"
					  Style="{DynamicResource GridSplitterStyle1}">
            <GridSplitter.Background>
                <LinearGradientBrush EndPoint="0.5,0" StartPoint="0.5,1">
                    <GradientStop Color="#A0A0A0" Offset="0"/>
                    <GradientStop Color="#E5E5E5" Offset="0.15"/>
                    <GradientStop Color="#ECECEC" Offset="0.8"/>
                    <GradientStop Color="#E5E5E5" Offset="1"/>
                </LinearGradientBrush>
            </GridSplitter.Background>
        </GridSplitter>
    </Grid>
#461 – Making a GridSplitter Look Three-Dimensional

You can make a GridSplitter element look like a more traditional three-dimensional element by using a Border and a gradient fill.  This will make it more obvious to the user that it is something that they can grab with the mouse.

In the XAML snippet below, the GridSplitter has a dark grey border and a gradient fill that goes from white to gray.

    <Grid>
        <Grid.RowDefinitions>
            <RowDefinition/>
            <RowDefinition Height="Auto"/>
            <RowDefinition/>
        </Grid.RowDefinitions>
        <Grid.ColumnDefinitions>
            <ColumnDefinition/>
            <ColumnDefinition/>
        </Grid.ColumnDefinitions>

        <Label Content="Row 0 Col 0" Background="Azure" Grid.Row="0" Grid.Column="0" />
        <Label Content="Row 0 Col 1" Background="Lavender" Grid.Row="0" Grid.Column="1" />
        <Label Content="Row 2 Col 0" Background="Moccasin" Grid.Row="2" Grid.Column="0" />
        <Label Content="Row 2 Col 1" Background="Honeydew" Grid.Row="2" Grid.Column="1" />

        <GridSplitter Grid.Row="1" Grid.ColumnSpan="2" Height="6" BorderThickness="1" BorderBrush="DarkSlateGray"
                      VerticalAlignment="Center" HorizontalAlignment="Stretch">
            <GridSplitter.Background>
                <LinearGradientBrush EndPoint="0.5,0" StartPoint="0.5,1">
                    <GradientStop Color="#FF808385" Offset="0"/>
                    <GradientStop Color="#FFECF1F7" Offset="1"/>
                </LinearGradientBrush>
            </GridSplitter.Background>
        </GridSplitter>

    </Grid>

#460 – A GridSplitter Can Share a Cell with Another Control

When using a GridSplitter in a Grid, you often define the Grid so that the GridSplitter is located within its own row (for a horizontal GridSplitter) or column (for a vertical GridSplitter).  However, you can also place a GridSplitter in a cell with another control.

In the example below, the horizonal GridSplitter is placed in the first row (of two rows), with two Label controls.

    <Grid>
        <Grid.RowDefinitions>
            <RowDefinition/>
            <RowDefinition/>
        </Grid.RowDefinitions>
        <Grid.ColumnDefinitions>
            <ColumnDefinition/>
            <ColumnDefinition/>
        </Grid.ColumnDefinitions>

        <Label Content="Row 0 Col 0" Background="Azure" Grid.Row="0" Grid.Column="0" />
        <Label Content="Row 0 Col 1" Background="Lavender" Grid.Row="0" Grid.Column="1" />
        <Label Content="Row 1 Col 0" Background="Moccasin" Grid.Row="1" Grid.Column="0" />
        <Label Content="Row 1 Col 1" Background="Honeydew" Grid.Row="1" Grid.Column="1" />

        <GridSplitter Grid.Row="0" Grid.ColumnSpan="2" Height="3" Background="Blue"
                      VerticalAlignment="Bottom" HorizontalAlignment="Stretch" />

    </Grid>


Note that we add the GridSplitter as the last element in the Grid, to make sure that it shows up on top of the Label that it shares a cell with.

#459 – Using Two (or More) GridSplitter Elements in the Same Grid

You can include more than one GridSplitter in a Grid by setting up the properties for each GridSplitter properly.

In the example below, we have both a vertical and a horizontal GridSplitter.

    <Grid>
        <Grid.RowDefinitions>
            <RowDefinition/>
            <RowDefinition Height="Auto"/>
            <RowDefinition/>
        </Grid.RowDefinitions>
        <Grid.ColumnDefinitions>
            <ColumnDefinition/>
            <ColumnDefinition Width="Auto"/>
            <ColumnDefinition/>
        </Grid.ColumnDefinitions>

        <Label Content="Row 0 Col 0" Background="Azure" Grid.Row="0" Grid.Column="0" />
        <Label Content="Row 0 Col 2" Background="Lavender" Grid.Row="0" Grid.Column="2" />
        <Label Content="Row 2 Col 0" Background="Moccasin" Grid.Row="2" Grid.Column="0" />
        <Label Content="Row 2 Col 2" Background="Honeydew" Grid.Row="2" Grid.Column="2" />

        <GridSplitter Grid.Row="1" Grid.ColumnSpan="3" Height="3" Background="Blue"
                      VerticalAlignment="Center" HorizontalAlignment="Stretch" />

        <GridSplitter Grid.Column="1" Grid.RowSpan="3" Width="3" Background="Green"
                      VerticalAlignment="Stretch" HorizontalAlignment="Center" />
    </Grid>


#458 – Properties to Set When Using a Horizontal or Vertical GridSplitter

To get the desired behavior when using a GridSplitter element, you need to set HorizontalAlignment and VerticalAlignment properties as shown below.

For a vertical splitter:

  • Put GridSplitter in its own column, setting column’s width to Auto
  • Set Grid.RowSpan to span all rows of the Grid
  • No need to set Grid.Row property  (defaults to 0)
  • Set Width of GridSplitter to be desired thickness
  • Set HorizontalAlignment to Center
  • Set VerticalAlignment to Stretch

For a horizontal splitter:

  • Put GridSplitter in its own row, setting row’s height to Auto
  • Set Grid.ColumnSpan to span all columns of the Grid
  • No need to set Grid.Column property  (defaults to 0)
  • Set Height of GridSplitter to be desired thickness
  • Set HorizontalAlignment to Stretch
  • Set VerticalAlignment to Center

#457 – Use a GridSplitter to Let a User Change Row or Column Size in a Grid

Rows and columns in a Grid don’t normally change their size at runtime, unless the content of the Grid changes.  But you can allow a user to change the size of rows or columns by using a GridSplitter element.

You typically place a GridSplitter in its own row or column.  In the example below, the middle column contains a blue GridSplitter.  At runtime, a user can click and drag on this element to change the relative sizes of columns 0 and 2.

    <Grid>
        <Grid.RowDefinitions>
            <RowDefinition/>
            <RowDefinition/>
        </Grid.RowDefinitions>
        <Grid.ColumnDefinitions>
            <ColumnDefinition/>
            <ColumnDefinition Width="Auto"/>
            <ColumnDefinition/>
        </Grid.ColumnDefinitions>

        <Label Content="Row 0 Col 0" Background="Azure" Grid.Row="0" Grid.Column="0" />
        <Label Content="Row 0 Col 2" Background="Lavender" Grid.Row="0" Grid.Column="2" />
        <Label Content="Row 1 Col 0" Background="Moccasin" Grid.Row="1" Grid.Column="0" />
        <Label Content="Row 1 Col 2" Background="Honeydew" Grid.Row="1" Grid.Column="2" />

        <GridSplitter Grid.Column="1" Grid.RowSpan="2" Width="3" Background="Blue"
                      VerticalAlignment="Stretch" HorizontalAlignment="Center" />
    </Grid>

Layout at startup:

User clicks and drags to the left:

Or drags to the right:

#456 – An Element in a Grid Can Span Multiple Rows or Columns

You can have child elements in a grid span multiple rows and/or multiple columns using the the Grid.RowSpan and Grid.ColumnSpan properties.

In the example below, the Image spans two rows and two columns and the TextBlock is located in a single row, but spans two columns.

    <Grid DataContext="{Binding GoodMovie}">
        <Grid.RowDefinitions>
            <RowDefinition Height="Auto"/>
            <RowDefinition Height="Auto"/>
            <RowDefinition Height="Auto"/>
            <RowDefinition Height="Auto"/>
            <RowDefinition Height="Auto"/>
        </Grid.RowDefinitions>
        <Grid.ColumnDefinitions>
            <ColumnDefinition Width="Auto"/>
            <ColumnDefinition Width="Auto"/>
            <ColumnDefinition Width="*"/>
            <ColumnDefinition Width="*"/>
        </Grid.ColumnDefinitions>

        <Image Source="{Binding Image}" Grid.RowSpan="2" Grid.ColumnSpan="2"
               Width="142" Height="216" Margin="5"
               HorizontalAlignment="Center" VerticalAlignment="Center"/>

        <Label Content="{Binding Title}" FontWeight="Bold" Grid.Row="0" Grid.Column="2"/>
        <Label Content="{Binding Year}" Grid.Row="0" Grid.Column="3"/>

        <TextBlock Text="{Binding Summary}" Grid.Row="1" Grid.Column="2" Grid.ColumnSpan="2"
                   TextWrapping="Wrap" Margin="8"/>

        <Label Content="Director:" Grid.Row="2" Grid.Column="0" HorizontalAlignment="Right"/>
        <Label Content="{Binding Director}" Grid.Row="2" Grid.Column="1" HorizontalAlignment="Left"/>

        <Label Content="Actor:" Grid.Row="3" Grid.Column="0" HorizontalAlignment="Right"/>
        <Label Content="{Binding ActorLead}" Grid.Row="3" Grid.Column="1" HorizontalAlignment="Left"/>

        <Label Content="Actress:" Grid.Row="4" Grid.Column="0" HorizontalAlignment="Right"/>
        <Label Content="{Binding ActressLead}" Grid.Row="4" Grid.Column="1" HorizontalAlignment="Left"/>
    </Grid>


You can see things a little better by turning on the grid lines.

#455 – Using ItemContainerStyle to Bind Data Elements in a Collection to a Grid

I showed earlier that to bind Grid.Row and Grid.Column properties on child items in an ItemsControl,  we need to set up the binding on the ContentPresenter elements that contain the individual items.  I did this by creating a class that inherited from ItemsControl and then set the bindings at runtime, programmatically.

There is a much easier way to do this, pointed out by reader Bruno (thanks Bruno)!

You can set up the bindings by specifying the ItemContainerStyle of the ItemsControl and using property setters to do the binding.

        <ItemsControl ItemsSource="{Binding ChessPieces}" Height="500" Width="500">
            <ItemsControl.ItemsPanel>
                <ItemsPanelTemplate>
                    <Grid ShowGridLines="True">
                        <Grid.RowDefinitions>
                            <RowDefinition Height="*"/>
                            <!-- 7 more rows -->
                        </Grid.RowDefinitions>
                        <Grid.ColumnDefinitions>
                            <ColumnDefinition Width="*"/>
                            <!-- 7 more columns -->
                        </Grid.ColumnDefinitions>
                    </Grid>
                </ItemsPanelTemplate>
            </ItemsControl.ItemsPanel>
            <ItemsControl.ItemTemplate>
                <DataTemplate>
                    <Label Content="{Binding Text}" HorizontalAlignment="Center" VerticalAlignment="Center"/>
                </DataTemplate>
            </ItemsControl.ItemTemplate>
            <ItemsControl.ItemContainerStyle>
                <Style>
                    <Setter Property="Grid.Row" Value="{Binding Row}"/>
                    <Setter Property="Grid.Column" Value="{Binding Column}"/>
                </Style>
            </ItemsControl.ItemContainerStyle>
        </ItemsControl>

#454 – UseLayoutRounding vs. SnapsToDevicePixels

The UIElement class has a SnapsToDevicePixels property that controls pixel snapping.  When set to true for a top-level element, all child elements will be set to line up with pixel boundaries at render time, to avoid anti-aliasing.

In .NET 4.0, the FrameworkElement class got a UseLayoutRounding property that also prevents anti-aliasing by snapping things to device pixels.

When you use the  UseLayoutRounding property, objects are lined up with pixel boundaries during the Measure and Arrange passes of the layout process.  When you use the SnapsToDevicePixels property, pixel snapping occurs when rendering elements.

You should use UseLayoutRounding when possible, or use SnapsToDevicePixels on child elements when it’s not possible to use UseLayoutRounding.

#453 – The UseLayoutRounding Property Aligns Things to Pixel Boundaries

Because WPF position GUI elements using device-independent units, small GUI elements can look fuzzy when rendered, due to anti-aliasing.

Notice that the edges of the Border elements are a little fuzzy in the example below.  Each element should have a width of 2 on this device, but the anti-aliasing leads to fuzzy edges.

The fuzzy edges are even more apparent if you zoom in.

You can prevent fuzziness due to anti-aliasing by setting the UseLayoutRounding property of a FrameworkElement to true.  Setting this property to true tells the layout system to line elements up with pixel boundaries, which prevents anti-aliasing.  This is known as pixel snapping.

Setting UseLayoutRounding to true on the parent Grid in the example above leads to consistently sized Border elements (2 pixels wide on a 96 dpi display).