#1,199 – Complete WPF Command Example

Below is a cheat sheet for creating a custom command in WPF.

Use a static property to expose a command object from the ViewModel or code-behind. RoutedUICommand allows for associating control text with the command itself.

private static RoutedUICommand _pressMeCommand = 
    new RoutedUICommand("Press Me", "PressMe", typeof(MainWindow));
public static RoutedUICommand PressMeCommand
{
    get { return _pressMeCommand; }
}

Add command handlers (in code-behind or ViewModel).

private void PressMe_CanExecute(object sender, CanExecuteRoutedEventArgs e)
{
    e.CanExecute = CowboyCanTalk;
}
 
private void PressMe_Executed(object sender, ExecutedRoutedEventArgs e)
{
    MessageBox.Show("Howdy howdy I'm a cowboy");
}

Bind the command to its handlers, done here in XAML for a window.

<Window.CommandBindings>
    <CommandBinding Command="local:MainWindow.PressMeCommand" 
                    CanExecute="PressMe_CanExecute" 
                    Executed="PressMe_Executed"/>
</Window.CommandBindings>

Wire a button up to the command. Note use of command’s Text property for the button’s Content (text).

<Button Command="local:MainWindow.PressMeCommand" 
        Content="{Binding RelativeSource={RelativeSource Self}, Path=Command.Text}" />

We can also wire up the command to other GUI elements, e.g. a menu item in a context menu. The menu item’s text is set up automatically.

<Window.ContextMenu>
    <ContextMenu>
        <MenuItem Command="{x:Static local:MainWindow.PressMeCommand}" />
    </ContextMenu>
</Window.ContextMenu>

#1,097 – Getting Items in Context Menu to Correctly Use Command Binding

Let’s say that you set up command bindings for a main Window in an application and then use the command for some control (e.g. a Button) and also within a ContextMenu.  (Assume that the GreetUser_CanExecute method always returns true).

    <Window.CommandBindings>
        <CommandBinding Command="{x:Static loc:MainWindow.GreetUserCommand}"
                        CanExecute="GreetUser_CanExecute"
                        Executed="GreetUser_Executed"/>
    </Window.CommandBindings>

    <Window.ContextMenu>
        <ContextMenu>
            <MenuItem Command="{x:Static loc:MainWindow.GreetUserCommand}"/>
        </ContextMenu>
    </Window.ContextMenu>
    <StackPanel>
        <TextBox Name="txtSomeText"
                 Width="220" Height="25" Margin="10"/>
        <Button HorizontalAlignment="Center"
                Padding="10,5" Margin="10"
                Content="{Binding RelativeSource={RelativeSource Self}, Path=Command.Text}"
                Command="{x:Static loc:MainWindow.GreetUserCommand}"/>
    </StackPanel>

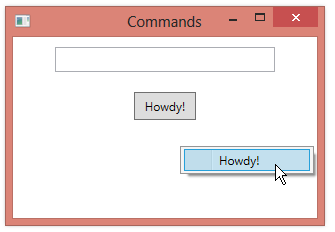
If you run this code and right-click on the window to bring up the context menu, the MenuItem is greyed out.  It’s not binding correctly to our CanExecute method.  The Button, on the other hand, did find the binding.

1097-001

The fix for this is to set the CommandTarget for the MenuItem to the PlacementTarget of the parent ContextMenu–the Window.  The MenuItem definition becomes:

            <MenuItem Command="{x:Static loc:MainWindow.GreetUserCommand}"
                      CommandTarget="{Binding Path=PlacementTarget, RelativeSource={RelativeSource AncestorType={x:Type ContextMenu}}}"/>

1097-002


#1,096 – The RoutedUICommand Adds a Text Property

When creating a custom command object, you can use either a RoutedCommand or a RoutedUICommand object.  Using the RoutedUICommand object allows you to associate some text with the command, using its Text property.  This text is typically the text that you want the user to see in the user interface.

Below, we create a new command and set its text.

    public partial class MainWindow : Window
    {
        public MainWindow()
        {
            InitializeComponent();
            this.DataContext = this;
        }

        public static RoutedCommand GreetUserCommand = new RoutedUICommand("Howdy!", "GreetUser", typeof(MainWindow));

        private void GreetUser_CanExecute(object sender, CanExecuteRoutedEventArgs e)
        {
            e.CanExecute = true;
        }

        private void GreetUser_Executed(object sender, ExecutedRoutedEventArgs e)
        {
            MessageBox.Show("Howdy howdy I'm a cowboy");
        }

        private void txtSomeText_PreviewExecuted(object sender, ExecutedRoutedEventArgs e)
        {
            if (e.Command == ApplicationCommands.Paste)
            {
                e.Handled = true;
            }
        }
    }

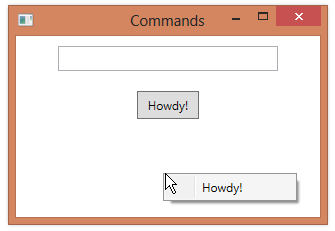
In XAML, we reference the Text property for a button’s content. Note that we don’t need to specify text for the MenuItem–it will automatically get the text from the RoutedUICommand.

    <Window.CommandBindings>
        <CommandBinding Command="{x:Static loc:MainWindow.GreetUserCommand}" CanExecute="GreetUser_CanExecute" Executed="GreetUser_Executed"/>
    </Window.CommandBindings>

    <Window.ContextMenu>
        <ContextMenu>
            <MenuItem Command="{x:Static loc:MainWindow.GreetUserCommand}"/>
        </ContextMenu>
    </Window.ContextMenu>
    <StackPanel>
        <TextBox Name="txtSomeText" CommandManager.PreviewExecuted="txtSomeText_PreviewExecuted" Width="220" Height="25" Margin="10"/>
        <Button HorizontalAlignment="Center" Padding="10,5" Margin="10" Content="{Binding RelativeSource={RelativeSource Self}, Path=Command.Text}" Command="{x:Static loc:MainWindow.GreetUserCommand}"/>
    </StackPanel>

1096-001

#1,095 – Creating and Using a Custom Command

While WPF provides a number of predefined routed commands that you can use, it can also be useful to define your own command to use in your application.

We start by defining an instance of a RoutedCommand, in this case defined as a static member of our main Window class.  We also define code for the CanExecute and Executed events that will perform the logic that we bind the command to.

    public partial class MainWindow : Window
    {
        public MainWindow()
        {
            InitializeComponent();
            this.DataContext = this;
        }

        public static RoutedCommand GreetUserCommand = new RoutedCommand();

        private void GreetUser_CanExecute(object sender, CanExecuteRoutedEventArgs e)
        {
            e.CanExecute = true;
        }

        private void GreetUser_Executed(object sender, ExecutedRoutedEventArgs e)
        {
            MessageBox.Show("Howdy howdy I'm a cowboy");
        }
    }

We can now set up a command binding from XAML and set the Command property for controls that should execute our command.

<Window x:Class="WpfApplication1.MainWindow"
        xmlns="http://schemas.microsoft.com/winfx/2006/xaml/presentation"
        xmlns:x="http://schemas.microsoft.com/winfx/2006/xaml"
        xmlns:loc="clr-namespace:WpfApplication1"
        Title="Commands" Width="320" Height="220">

    <Window.CommandBindings>
        <CommandBinding Command="{x:Static loc:MainWindow.GreetUserCommand}"
                        CanExecute="GreetUser_CanExecute"
                        Executed="GreetUser_Executed"/>
    </Window.CommandBindings>

    <Window.ContextMenu>
        <ContextMenu>
            <MenuItem Command="{x:Static loc:MainWindow.GreetUserCommand}"
                          Header="Say Howdy"/>
        </ContextMenu>
    </Window.ContextMenu>
    <StackPanel>
        <Button Content="Howdy" HorizontalAlignment="Center"
                Padding="10,5" Margin="10"
                Command="{x:Static loc:MainWindow.GreetUserCommand}"/>
    </StackPanel>
</Window>

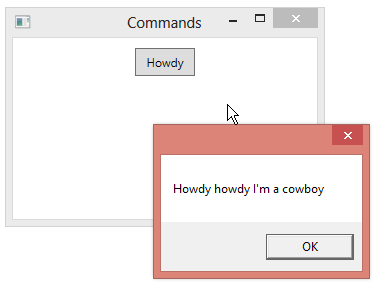
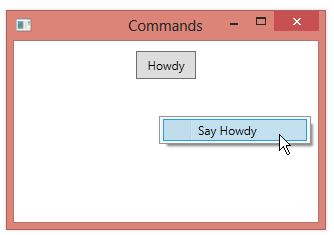
We now have a command that executes when we click a button or a menu item in a context menu.

1095-001

1095-002

#1,093 – Intercepting a Command Before It Executes

When a command that is bound to an element executes, it executes some code.  The code is linked to the command as part of the command binding.  In some cases, you don’t have access to this code.  The TextBox control, for example, has built-in commands for cut/copy/paste features.

You can intercept a command that is about to be executed on an element by defining a handler for the PreviewExecuted event.

        <TextBox Name="txtSomeText"
                 CommandManager.PreviewExecuted="txtSomeText_PreviewExecuted"
                 Width="220" Height="25" Margin="10"/>

In the body of the PreviewExecuted handler, you can determine what command is being executed.  You can cancel the execution by setting the Handled property to true.  In the example below, we prohibit Paste functionality in the TextBox.

        private void txtSomeText_PreviewExecuted(object sender, ExecutedRoutedEventArgs e)
        {
            if (e.Command == ApplicationCommands.Paste)
            {
                e.Handled = true;
            }
        }

#1,092 – An Example of Using a CommandTarget

Setting the CommandTarget property allows an element executing a routed command to initiate the routing of a command with a different element.

In the example below, clicking on the Button initiates a Paste command, but the routed command originates with a TextBox rather than the button.  In this particular case, because a TextBox implicitly has a command binding for the Paste command, text currently in the paste buffer is automatically pasted into the TextBox.  No code-behind is required in order for this to work.

<Window x:Class="WpfApplication1.MainWindow"
        xmlns="http://schemas.microsoft.com/winfx/2006/xaml/presentation"
        xmlns:x="http://schemas.microsoft.com/winfx/2006/xaml"
        Title="Commands" Width="320" Height="220">

    <StackPanel>
        <TextBox Name="txtSomeText"
                 Width="220" Height="25" Margin="10"/>
        <Button Content="Paste"
                Command="ApplicationCommands.Paste"
                CommandTarget="{Binding ElementName=txtSomeText}"
                Margin="10" Padding="10,3"
                HorizontalAlignment="Center" />
    </StackPanel>
</Window>

1092-001

#1,091 – Using a CommandTarget to Change the Source of a Routed Command

The source of a routed command is the element that is invoking the command.  The sender parameter in the Executed or CanExecute handlers is the object that owns the event handler.  Setting the Command parameter of a Button to a particular command and then binding the command to some code in the CommandBindings for a main Window, the button is the source and the window is the sender.

When setting the Command property, you can also set the CommandTarget property, indicating a different element that should be treated as the source of the routed command.

<Window x:Class="WpfApplication1.MainWindow"
        xmlns="http://schemas.microsoft.com/winfx/2006/xaml/presentation"
        xmlns:x="http://schemas.microsoft.com/winfx/2006/xaml"
        Title="Commands" Width="320" Height="220">

    <Window.CommandBindings>
        <CommandBinding Command="ApplicationCommands.Find"
                        CanExecute="Find_CanExecute"
                        Executed="Find_Executed"/>
    </Window.CommandBindings>

    <StackPanel>
        <TextBox Name="txtSomeText"
                 Width="140" Height="25" Margin="10"/>
        <Button Content="Find"
                Command="ApplicationCommands.Find"
                CommandTarget="{Binding ElementName=txtSomeText}"
                Margin="10" Padding="10,3"
                HorizontalAlignment="Center" />
    </StackPanel>
</Window>

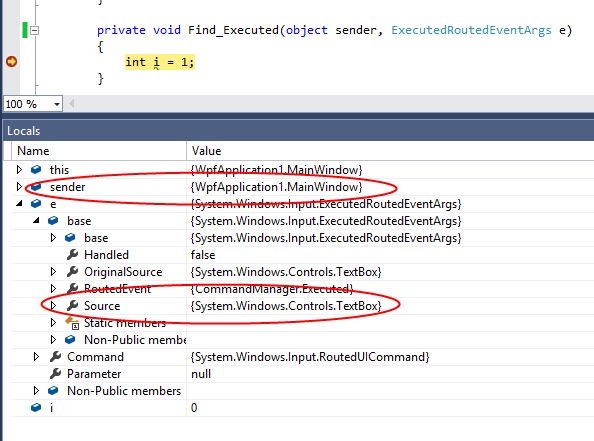
The Find command now appears to originate from the TextBox.  We can see this in the event handler for the Executed event.

1091-001


#1,090 – Sender vs. Source in CommandBinding Event Handlers

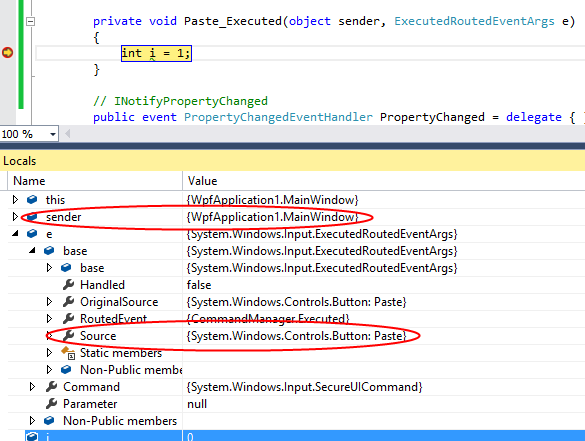
When handling a command’s Executed or CanExecute events, you can check the ExecutedRoutedEventArgs.Source or CanExecuteRoutedEventArgs.Source properties to get at the control that is the originator of the event.  But the event handler also includes a sender parameter that in many cases also points to the originator of the event.

The difference is:

  • The Source property refers to the originator of the event
  • The sender parameter refers to the object that owns the event handler

In the example below, clicking on the Button initiates a Paste command, which is bound to code using the parent Window’s CommandBindings property.

<Window x:Class="WpfApplication1.MainWindow"
        xmlns="http://schemas.microsoft.com/winfx/2006/xaml/presentation"
        xmlns:x="http://schemas.microsoft.com/winfx/2006/xaml"
        Title="Commands" Width="320" Height="220">

    <Window.CommandBindings>
        <CommandBinding Command="ApplicationCommands.Paste"
                        CanExecute="Paste_CanExecute"
                        Executed="Paste_Executed"/>
    </Window.CommandBindings>

    <StackPanel>
        <Button Content="Paste"
                Command="ApplicationCommands.Paste"
                Margin="10" Padding="10,3"
                HorizontalAlignment="Center" />
    </StackPanel>
</Window>

The Button is the Source of the routed command and the main Window is the sender.

1090-001

#1,089 – Adding a Parameter to a Command

When you set the Command property of a user interface element, you’re binding that element to a particular command.  The command, in turn, is associated with some code through its Executed property.

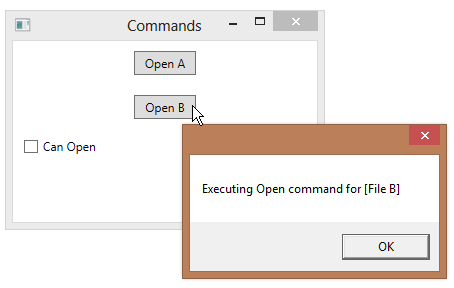
You can specify a command parameter using the CommandParameter property.  The data in this property will be passed to the code that runs when the command executes.

The XAML fragment below shows two buttons that both bind to the same command, but pass in different data.

        <Button Content="Open A"
                Command="ApplicationCommands.Open"
                CommandParameter="File A"
                Margin="10" Padding="10,3"
                HorizontalAlignment="Center" />
        <Button Content="Open B"
                Command="ApplicationCommands.Open"
                CommandParameter="File B"
                Margin="10" Padding="10,3"
                HorizontalAlignment="Center" />

We can then read that parameter in the code bound to the command’s Executed property.

        public void Executed_Open(object sender, ExecutedRoutedEventArgs e)
        {
            MessageBox.Show(string.Format("Executing Open command for [{0}]", e.Parameter));
        }

1089-001

#1,088 – Removing Key Bindings

You’ll sometimes discover that there are built-in key bindings that you want to get rid of.  If you define the KeyBinding shown below, you’ll discover that the Ctrl+Alt+O key sequence works to execute the Open command, as expected.  But the Ctrl+O sequence also appears to do the same thing.

    <Window.CommandBindings>
        <CommandBinding Command="ApplicationCommands.Open"
                        Executed="Executed_Open"
                        CanExecute="CanExecute_Open"/>
    </Window.CommandBindings>
    <Window.InputBindings>
        <KeyBinding Command="ApplicationCommands.Open"
                    Gesture="Ctrl+Alt+O"/>
    </Window.InputBindings>

Ctrl+O is automatically defined as an existing key binding that binds to the ApplicationCommands.Open command.  You can remove it by binding Ctrl+O to the ApplicationCommands.NotACommand command.  Ctrl+O will no longer be associated with the Open command.

        <Window.InputBindings>
            <KeyBinding Command="ApplicationCommands.Open"
                        Gesture="Ctrl+Alt+O"/>
            <KeyBinding Command="ApplicationCommands.NotACommand"
                        Gesture="Ctrl+O"/>
        </Window.InputBindings>