#1,043 – Using a DockPanel as the Items Panel for a ListBox

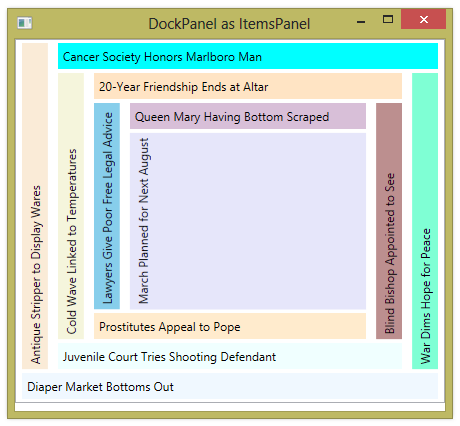
You can replace the default StackPanel used as the items panel for a ListBox with any other panel element.  Below is an example of displaying some news stories in a DockPanel.

Assume that we have a NewsStory class as follow:

    public class NewsStory
    {
        public string Story { get; set; }
        public Brush Color { get; set; }
        public Dock Dock { get; set; }
        public double Rotate { get; set; }

        public NewsStory(string story, Color color, Dock dock, double rotate)
        {
            Story = story;
            Color = new SolidColorBrush(color);
            Dock = dock;
            Rotate = rotate;
        }

        public override string ToString()
        {
            return Story;
        }
    }

We can then create a collection of NewsStory items that we’ll bind to.  Notice that we create a spiral pattern by setting consecutive Dock properties to Bottom/Left/Top/Right.  We also use the Angle property to rotate every other element.

    public partial class MainWindow : Window, INotifyPropertyChanged
    {
        public MainWindow()
        {
            InitializeComponent();
            this.DataContext = this;

            Stories = new ObservableCollection<NewsStory>
            {
                new NewsStory("Diaper Market Bottoms Out", Colors.AliceBlue, Dock.Bottom, 0.0),
                new NewsStory("Antique Stripper to Display Wares", Colors.AntiqueWhite, Dock.Left, -90.0),
                new NewsStory("Cancer Society Honors Marlboro Man", Colors.Aqua, Dock.Top, 0.0),
                new NewsStory("War Dims Hope for Peace", Colors.Aquamarine, Dock.Right, -90.0)
                // more entries go here..
            };
            RaisePropertyChanged("Stories");

        }

        public ObservableCollection<NewsStory> Stories { get; protected set; }

        // INotifyPropertyChanged
        public event PropertyChangedEventHandler PropertyChanged = delegate { };

        private void RaisePropertyChanged(string propName)
        {
            PropertyChanged(this, new PropertyChangedEventArgs(propName));
        }
    }

In XAML, we set the ItemContainerStyle to do the docking and specify a DockPanel as the ItemsPanel.

        <ListBox ItemsSource="{Binding Stories}">
            <ListBox.ItemContainerStyle>
                <Style TargetType="{x:Type ListBoxItem}">
                    <Setter Property="DockPanel.Dock" Value="{Binding Dock}"/>
                    <Setter Property="HorizontalContentAlignment" Value="Stretch"/>
                    <Setter Property="VerticalContentAlignment" Value="Stretch"/>
                </Style>
            </ListBox.ItemContainerStyle>
            <ListBox.ItemsPanel>
                <ItemsPanelTemplate>
                    <DockPanel IsItemsHost="True"/>
                </ItemsPanelTemplate>
            </ListBox.ItemsPanel>
            <ListBox.ItemTemplate>
                <DataTemplate>
                    <Label Content="{Binding Story}"
                           Background="{Binding Color}">
                        <Label.LayoutTransform>
                            <RotateTransform Angle="{Binding Rotate}"/>
                        </Label.LayoutTransform>
                    </Label>
                </DataTemplate>
            </ListBox.ItemTemplate>
        </ListBox>

Here’s what the end result looks like:

1044-001

#980 – Binding ListBox Selection to Property on Bound Object

Normally, when you use a ListBox, the ListBox itself persists the record of which items are selected.  You might also want to persist information about which items are selected within the actual data objects that you’re binding to.

You can bind the IsSelected property of each list box item to a boolean property on the data object as shown below.

        <ListBox Name="lbActors" Margin="15" Width="200" Height="190"
                 SelectionMode="Multiple"
                 ItemsSource="{Binding ActorList}">
            <ListBox.ItemContainerStyle>
                <Style TargetType="{x:Type ListBoxItem}">
                    <Setter Property="IsSelected" Value="{Binding IsFav}"/>
                </Style>
            </ListBox.ItemContainerStyle>
        </ListBox>

Now, as you select/unselect items, the IsFav property in the corresponding Actor object is set or cleared.  Also, when your application starts, the ListBox selection will initially be set to reflect the value of this property.

        private void Button_Click(object sender, RoutedEventArgs e)
        {
            StringBuilder sbInfo = new StringBuilder();

            // Who are favorites?
            foreach (Actor a in lbActors.Items)
            {
                if (a.IsFav)
                    sbInfo.AppendLine(a.FullName);
            }

            MessageBox.Show(sbInfo.ToString());
        }

980-001

#977 – DisplayMemberPath Indicates Property to Use for Displaying Bound Items

When you use data binding to bind an ItemsControl to a collection, there are several ways to control how each item in the list is rendered:

  • Rely on the ToString method of the bound item to generate a string to be displayed
  • Use a data template to create a more complex rendering of the item
  • Use the DisplayMemberPath property to indicate which property should be used in generating a string

DisplayMemberPath can be set to the name of a property (of type string) on the bound object.  The value of that property is then used as the displayed value of each item in the list.

Below, the KnownFor property of an Actor is used to generate the string in the ListBox.

        <ListBox Margin="15" Width="200" Height="150"
                 ItemsSource="{Binding ActorList}"
                 DisplayMemberPath="KnownFor"
                 SelectedItem="{Binding SelectedActor}"/>
        <TextBlock Text="{Binding SelectedActor.FullName}"
                   HorizontalAlignment="Center" Margin="0,5"/>

977-001

#907 – Binding a TabControl to a List of Objects, part I

Instead of explicitly defining each tab of a TabControl in XAML, you can bind the TabControl to a list of objects, each tab representing an object in the list.

Suppose that we have a collection of Emperor objects, as follows:

public MainWindow()
{
this.InitializeComponent();
this.DataContext = this;

romanDudes = new ObservableCollection&lt;Emperor&gt;();
romanDudes.Add(new Emperor("Augustus", "27 BC", "14 AD", "Found bricks, left marble",
new Uri("Augustus.jpg", UriKind.Relative)));
// Add more dudes here
RaisePropertyChanged("RomanDudes");
}

private ObservableCollection&lt;Emperor&gt; romanDudes;
public ObservableCollection&lt;Emperor&gt; RomanDudes
{
get { return romanDudes; }
}

// INotifyPropertyChanged
public event PropertyChangedEventHandler PropertyChanged = delegate { };

private void RaisePropertyChanged(string propName)
{
PropertyChanged(this, new PropertyChangedEventArgs(propName));
}

We set the ItemsSource of the TabControl to the list:

&lt;TabControl Margin="5"
ItemsSource="{Binding RomanDudes}"/&gt;

The TabControl now creates a tab for each Emperor object.
907-001
Both the Header and the Content for each TabItem defaults to the object’s string representation–the emperor’s name, in this case).

#828 – ListView and GridView Data Binding Example

ListView control contains a collection of items that you can view in different ways.  The current view can be set using the View property, which can be set to an instance of a GridView.  A GridView is an object that can display the data in columns.

Below is a complete example of a bound ListView that uses a GridView to display its items.  The ListView is bound to a collection and the GridView contains GridViewColumn instances, each of which is bound to a property of the items contained in the collection.

    <StackPanel>
        <Label Content="Ad eundum quo nemo ante iit"
               Margin="5"
               Background="LightCoral"/>
        <ListView ItemsSource="{Binding Guys}">
            <ListView.View>
                <GridView>
                    <GridViewColumn DisplayMemberBinding="{Binding Name}"
                                    Header="Guy"/>
                    <GridViewColumn DisplayMemberBinding="{Binding Age}"
                                    Header="Age"/>
                </GridView>
            </ListView.View>
        </ListView>
    </StackPanel>

The code-behind for the top-level Window sets the data context and creates the collection.

    public partial class MainWindow : Window, INotifyPropertyChanged
    {
        public ObservableCollection<Person> Guys { get; protected set; }

        public MainWindow()
        {
            this.InitializeComponent();
            this.DataContext = this;

            Guys = new ObservableCollection<Person>();
            Guys.Add(new Person("Julius Caesar", 40));
            Guys.Add(new Person("Pompeius Magnus", 46));
            Guys.Add(new Person("Marcus Crassus", 55));
            RaisePropertyChanged("Guys");
        }

        public event PropertyChangedEventHandler PropertyChanged = delegate { };

        private void RaisePropertyChanged(string propName)
        {
            PropertyChanged(this, new PropertyChangedEventArgs(propName));
        }
    }

For completeness, here is the implementation of the Person class.

    public class Person :  INotifyPropertyChanged
    {
        public string Name { get; set; }
        public int Age { get; set; }

        public Person(string name, int age)
        {
            Name = name;
            Age = age;
        }

        public event PropertyChangedEventHandler PropertyChanged;

        private void RaisePropertyChanged(string propName)
        {
            PropertyChanged(this, new PropertyChangedEventArgs(propName));
        }
    }

828-001

#765 – WPF Data Binding Ignores CurrentCulture

Using the ToString method on numeric and date-based types from within your code, the output will reflect the current culture, as stored in the CurrentCulture property of the current thread.

When the data binding mechanism in WPF converts numeric or date-based data to a string, however, it doesn’t automatically use the current culture.  Instead, you must set the Language property of the FrameworkElement where the binding is occurring.  You typically set this property based on the CurrentCulture property of the current thread.  You can set the Language property of the topmost user-interface element, so that all of the other elements inherit the value.

        public MainWindow()
        {
            InitializeComponent();
            this.DataContext = this;

            this.Language = XmlLanguage.GetLanguage(CultureInfo.CurrentCulture.IetfLanguageTag);
        }

We can now do binding as follows (where BoundDate property is of type DateTime):

        <TextBlock Text="{Binding BoundDate, StringFormat=d}"/>

Now if we run with the region set to French (France), we see:
765-001

#451 – Data Binding Elements in a Collection to a Grid, Part IV

Our first attempt to bind elements in a collection to a Grid didn’t work as expected.  We set the Grid.Row and Grid.Column properties in the data template, but the items did not show up in the correct row and column.

The problem is that when we’re setting the Grid.Row and Grid.Column properties on the Label control in the data template, these Label controls are not direct children of the Grid, so the properties have no effect.

We can look at the visual tree of the ItemsControl to see this.  The direct child elements of the Grid are actually instances of a ContentPresenter.

What we really want to do is set the value of the Grid.Row and Grid.Column properties on the ContentPresenter, rather than the Label.  I’ll show how to do that in the next post.


#360 – Binding a ToggleButton’s IsChecked Property to a Boolean Variable

Instead of handling the Checked and Unchecked events of a ToggleButton and then setting a boolean variable to represent the current state, you’ll most often just use data binding to bind the IsChecked property to a boolean variable.

In the example below, we have three ToggleButton controls, each bound to a boolean property.

        <StackPanel Orientation="Horizontal">
            <ToggleButton Content="Bold" IsChecked="{Binding Bold}"  FontWeight="Bold" Padding="5" />
            <ToggleButton Content="Italic" IsChecked="{Binding Italic}" FontStyle="Italic" Padding="5"/>
            <ToggleButton IsChecked="{Binding Underline}" Padding="5" >
                <TextBlock>
                    <Underline>Underline</Underline>
                </TextBlock>
            </ToggleButton>
        </StackPanel>
        <Button Content="Test" Click="Button_Click" Margin="15" Padding="3"/>

In the code-behind, we define the boolean properties that we can bind to and then set the data context to refer to the parent class.

        public bool Bold { get; set; }
        public bool Italic { get; set; }
        public bool Underline { get; set; }

		public MainWindow()
		{
			this.InitializeComponent();
            this.DataContext = this;
        }

        private void Test_Click(object sender, RoutedEventArgs e)
        {
            MessageBox.Show(string.Format("Bold: {0}, Italic: {1}, Underline: {2}", Bold, Italic, Underline));
        }

#148 – Property Values Set Using Expressions Overwrite the Base Value

In the list of all possible sources for a dependency property value, we explain that a property’s base value can in turn be overwritten by the result of an expression.  If the property’s value is set using an expression, the value of the expression takes precedence over the property’s base value.

In WPF, if the value of a dependency property is set using an expression, the expression can be one of two types:

  • Data binding – set the value of the property by binding it to another property
  • Resources – set the value of the property to a resource, loaded from a resource dictionary


#126 – Reacting to a Dependency Property Change Using Binding

One way to react to a dependency property’s value changing is by binding the property of one control to the property of another control.

The idea with binding is that there is a source object and property, where the data is coming from, and a target object and property.

Here’s an example where we bind the contents of a Label control to the value of a Slider.

        <Slider Name="slider1" Maximum="100" />
        <Label Name="lblTest" Content="{Binding ElementName=slider1, Path=Value}"/>

The Label is the target control.  We bind its Content property to the Slider control’s Value content.  When a user slides the slider, its value will change and the new value will be displayed in the Label.

Binding the property of one control to the property of another control