#1,169 – Custom Panel, part I (Measure and Arrange)

You can create a class that derives from Panel in order to create a panel control with custom behavior.  You typically override the following two methods in your custom panel:

  • MeasureOverride – You call Measure method on each child element to determine how much space they need, then return the total space needed
  • ArrangeOverride – You call Arrange method for each child element to position them

Below is a very simple example–a panel that does nothing in either its MeasureOverride or ArrangeOverride methods.  We’ll build on this class in future posts.

    public class MyPanel : Panel
    {
        protected override Size MeasureOverride(Size availableSize)
        {
            Size measuredSize = base.MeasureOverride(availableSize);
            return measuredSize;
        }

        protected override Size ArrangeOverride(Size finalSize)
        {
            Size arrangedSize = base.ArrangeOverride(finalSize);
            return arrangedSize;
        }
    }

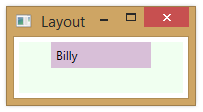
If we add children to this panel, they will not be displayed. Below is debug output at run-time. MeasureOverride returns (0,0) because we haven’t calculated any sizes.
1169-001

#1,168 – Layout in Action, part V

When a panel is laying out its children, it will respect (make use of) an explicit size specified for a child control.

In the example below, the MyLabel control specifies a width of 100.  This makes it wider than it would normally be to fit its content.

    <StackPanel Margin="5" Background="Honeydew">
        <loc:MyLabel Content="Billy" HorizontalAlignment="Center" Width="100"
                     Background="Thistle" />
    </StackPanel>

1168-001
At run-time, the measure/arrange process is:

  • StackPanel reads the label’s desired width of 100, using this value as the “constrained” width (target width)
  • StackPanel calls Measure on the label, with constrained width of 100 and height of Infinity
  • Label returns a size from MeasureOverride with width and height equal to what’s required for its content (31.4 wide x 26 high)
  • StackPanel calls Arrange on MyLabel, passing in a size that includes the explicit width (100 x 26)

1168-002

#1,167 – Layout in Action, part IV

The previous example showed how layout works when a child element needs less space than what it is available.  Below, we walk through the case when the child needs more space than what’s available.

Assume that we have a Label with more content than will fit into a containing StackPanel (which sizes to fit a containing window).  At run-time, the measure/arrange process is:

  • StackPanel calls Measure on the label, passing in its own width as a constraint width and infinity as a constraint height.
  • Label can’t fit into specified constraint width, so it returns a size from MeasureOverride with width equal to constraint width (it takes what it can get) and height to fit its desired height
  • StackPanel gives the label this requested height and width
  • StackPanel calls Arrange on MyLabel, which uses specified size to render label

1167-001

1167-002

#1,166 – Layout in Action, part III

Layout in WPF dictates how layout panels (containers) arrange their child elements.  In the example below, we build on an earlier example to show how the measure and arrange phases work when host a Label in control in a StackPanel and then stretch the label.

Suppose the we have the XAML shown below. Note that the HorizontalAlignment of the Label is set to Stretch.

    <StackPanel Margin="5" Background="Honeydew">
        <loc:MyLabel Content="Billy" Background="Thistle"
                     HorizontalAlignment="Stretch" />
    </StackPanel>

At run-time this looks like:
1166-001
At run-time, the measure/arrange process is:

  • StackPanel calls Measure on MyLabel
  • Base Label class calculates how much space it needs (31.4 x 26) and MyLabel returns this value from MeasureOverride
  • StackPanel decides to give the label the requested height, but stretches out its width
  • StackPanel calls Arrange on MyLabel, passing in size of 164 x 26
  • MyLabel.ArrangeOverride receives this value, passing on to base Label class
  • Base Label class uses this size to know how to render label

Here’s some run-time output showing these values:

1166-002

#1,165 – Layout in Action, part II

Layout in WPF dictates how layout panels (containers) arrange their child elements.  Below is a simple example of a StackPanel containing a custom Label that we’ve instrumented so that we can see when its Measure and Arrange methods are called.  (MyPanel derives from Label).

Suppose we use the label as follows:

    <StackPanel Margin="5" Background="Honeydew">
        <loc:MyLabel Content="Billy" Background="Thistle"
                     HorizontalAlignment="Center" />
    </StackPanel>

The label looks like this at run-time:
1165-001


At run-time, the measure/arrange process is:

  • StackPanel calls Measure on MyLabel
  • Base Label class calculates how much space it needs (31.4 x 26) and MyLabel returns this value from MeasureOverride
  • StackPanel decides to give the label the space that it needs/wants
  • StackPanel calls Arrange on MyLabel, passing in size of 31.4 x 26
  • MyLabel.ArrangeOverride receives this value, passing on to base Label class
  • Base Label class uses this size to know how to render label

Here’s some run-time output showing these values:

1165-002

#1,164 – Using Animation to Bounce a Control

The XAML fragment below will start a Button bouncing when you click on it.  This uses the BounceEase object as an easing function.  You can play with the animation duration, # bounces, and “bounciness” to get different effects.

	<Grid>
        <Grid.RowDefinitions>
            <RowDefinition/>
            <RowDefinition/>
        </Grid.RowDefinitions>
        <Button Content="Click Me" Margin="20,5,20,35"
                VerticalAlignment="Bottom">
            <Button.RenderTransform>
                <TranslateTransform x:Name="transTransform" X="0" Y="0"/>
            </Button.RenderTransform>
            <Button.Triggers>
                <EventTrigger RoutedEvent="Button.Click">
                    <BeginStoryboard>
                        <Storyboard>
                            <DoubleAnimation From="0" To="35" Duration="00:00:01" 
                                    Storyboard.TargetName="transTransform" 
                                    Storyboard.TargetProperty="Y"
                                    AutoReverse="True" RepeatBehavior="Forever">
                                <DoubleAnimation.EasingFunction>
                                    <BounceEase Bounces="1" EasingMode="EaseOut"
                                                Bounciness="2" />
                                </DoubleAnimation.EasingFunction>
                            </DoubleAnimation>
                        </Storyboard>
                    </BeginStoryboard>
                </EventTrigger>
            </Button.Triggers>
        </Button>
        <Border Grid.Row="1"
            BorderBrush="Black" BorderThickness="10"/>
    </Grid>

#1,163 – Make an Image Clickable with a Control Template

You can allow clicking on an Image by using it as the control template for a Button.

In the example below, we define a button that consists of an image and a border that lights up when you hover over the image.

	<StackPanel>
		<Button Click="Button_Click"
                Margin="10"
			    HorizontalAlignment="Center"
			    ToolTip="Click on Fred">
			<Button.Template>
				<ControlTemplate>
					<Border x:Name="theBorder" 
                            BorderBrush="Transparent"
                            BorderThickness="2">
						<Image Source="Astaire.png" Height="45"/>
					</Border>
                    <ControlTemplate.Triggers>
                        <Trigger Property="IsMouseOver" Value="True">
                            <Setter Property="BorderBrush" TargetName="theBorder" 
                                    Value="LightSkyBlue"/>
                        </Trigger>
                    </ControlTemplate.Triggers>
				</ControlTemplate>
			</Button.Template>
		</Button>
	</StackPanel>

Below, we can see the clickable Image in action.
1163-001

1163-002

1163-003

#1,162 – Layout in Action, part I

Layout in WPF dictates how layout panels (containers) arrange their child elements.  Layout consists of two phases:

  • Measure – Container asks each child what its desired size is
    • Container calls Measure on each child element
    • In MeasureOverride, child element determines how much size it wants (typically by calling Measure on each of its own child elements)
    • Child element returns its desired size, to fit its child elements
  • Arrange – Container figures out how to arrange its children and decides on final position and size of each child
    • Container calls Arrange on each child element, passing in a size
    • In ArrangeOverride, child element is told how big it should be
    • Child element in turn tells each of its visual children how big they are going to be, by calling their Arrange methods
    • Child element returns final total arranged size to container

#1,161 – Using Custom Circular Progress Shape in Control Template

In the previous example, we created a custom circular progress shape and then composed it along with a TextBlock to get a labeled circular progress control.

The other approach that we could take is to just create a new control template containing our circular progress shape and a TextBlock and then use that new template as the control template for a standard ProgressBar.

Assuming that we start with the earlier code for CircularProgress, we compose the template and use it as follows:

	<Window.Resources>
        <loc:DoubleToPctConverter x:Key="dblToPct"/>
		<Style x:Key="pbarCircularStyle" TargetType="{x:Type ProgressBar}">
			<Setter Property="Foreground" Value="#01D328"/>
            <Setter Property="Maximum" Value="100"/>
            <Setter Property="Height" Value="100"/>
            <Setter Property="Width" Value="100"/>
            <Setter Property="Template">
				<Setter.Value>
					<ControlTemplate TargetType="{x:Type ProgressBar}">
						<Grid x:Name="TemplateRoot" SnapsToDevicePixels="true">
                            <TextBlock HorizontalAlignment="Center" VerticalAlignment="Center"
                                       FontSize="32" Foreground="DarkGray"
                                       Text="{TemplateBinding Value, Converter={StaticResource dblToPct}}" />
                            <loc:CircularProgress Stroke="{TemplateBinding Foreground}"
                                                  Value="{TemplateBinding Value}"/>
						</Grid>
					</ControlTemplate>
				</Setter.Value>
			</Setter>
		</Style>
	</Window.Resources>

    <StackPanel>
        <Grid>
			<ProgressBar Style="{DynamicResource pbarCircularStyle}"
						 Value="{Binding PctComplete}"
						 Margin="10"/>
        </Grid>
        <Button Content="Start Timer" Click="Button_Click"
                HorizontalAlignment="Center"
                Padding="12,7"/>
    </StackPanel>

1161-001

For completeness, here’s the source code for our value converter:

    public class DoubleToPctConverter : IValueConverter
    {
        public object Convert(object value, Type targetType, object parameter, System.Globalization.CultureInfo culture)
        {
            string result = "";
            double d = (double)value;
            result = string.Format("{0}%", d);

            return result;
        }

        public object ConvertBack(object value, Type targetType, object parameter, System.Globalization.CultureInfo culture)
        {
            throw new NotImplementedException();
        }
    }

#1,160 – Adding a Text Label to the Circular Progress Control

In an earlier post, we created a custom circular progress control, deriving from a Shape element.  Below, we add a text element in the middle of the progress arc to indicate % complete.  We could have also done this by building the text into the control itself.  But the approach shown below is an example of combining the progress control with a user-defined text label.

    <StackPanel>
        <Grid>
            <loc:CircularProgress
                x:Name="circProg"
                Value="{Binding PctComplete}"
                Height="100" Width="100" Margin="5"
                HorizontalAlignment="Center"/>
            <TextBlock
                HorizontalAlignment="Center"
                VerticalAlignment="Center"
                FontSize="36" Foreground="DarkGray"
                Text="{Binding ElementName=circProg, Path=Value}" />
        </Grid>
        <ProgressBar x:Name="prog2" Maximum="100"
                     Value="{Binding PctComplete}"
                     Height="25" Margin="10"/>
        <Button Content="Start Timer" Click="Button_Click"
                HorizontalAlignment="Center"
                Padding="12,7"/>
    </StackPanel>

1160-001