#1,199 – Complete WPF Command Example

Below is a cheat sheet for creating a custom command in WPF.

Use a static property to expose a command object from the ViewModel or code-behind. RoutedUICommand allows for associating control text with the command itself.

private static RoutedUICommand _pressMeCommand = 
    new RoutedUICommand("Press Me", "PressMe", typeof(MainWindow));
public static RoutedUICommand PressMeCommand
{
    get { return _pressMeCommand; }
}

Add command handlers (in code-behind or ViewModel).

private void PressMe_CanExecute(object sender, CanExecuteRoutedEventArgs e)
{
    e.CanExecute = CowboyCanTalk;
}
 
private void PressMe_Executed(object sender, ExecutedRoutedEventArgs e)
{
    MessageBox.Show("Howdy howdy I'm a cowboy");
}

Bind the command to its handlers, done here in XAML for a window.

<Window.CommandBindings>
    <CommandBinding Command="local:MainWindow.PressMeCommand" 
                    CanExecute="PressMe_CanExecute" 
                    Executed="PressMe_Executed"/>
</Window.CommandBindings>

Wire a button up to the command. Note use of command’s Text property for the button’s Content (text).

<Button Command="local:MainWindow.PressMeCommand" 
        Content="{Binding RelativeSource={RelativeSource Self}, Path=Command.Text}" />

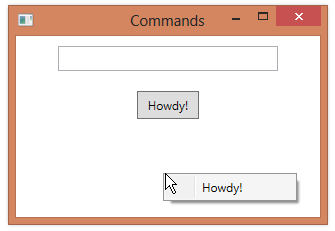
We can also wire up the command to other GUI elements, e.g. a menu item in a context menu. The menu item’s text is set up automatically.

<Window.ContextMenu>
    <ContextMenu>
        <MenuItem Command="{x:Static local:MainWindow.PressMeCommand}" />
    </ContextMenu>
</Window.ContextMenu>
#1,096 – The RoutedUICommand Adds a Text Property

When creating a custom command object, you can use either a RoutedCommand or a RoutedUICommand object.  Using the RoutedUICommand object allows you to associate some text with the command, using its Text property.  This text is typically the text that you want the user to see in the user interface.

Below, we create a new command and set its text.

    public partial class MainWindow : Window
    {
        public MainWindow()
        {
            InitializeComponent();
            this.DataContext = this;
        }

        public static RoutedCommand GreetUserCommand = new RoutedUICommand("Howdy!", "GreetUser", typeof(MainWindow));

        private void GreetUser_CanExecute(object sender, CanExecuteRoutedEventArgs e)
        {
            e.CanExecute = true;
        }

        private void GreetUser_Executed(object sender, ExecutedRoutedEventArgs e)
        {
            MessageBox.Show("Howdy howdy I'm a cowboy");
        }

        private void txtSomeText_PreviewExecuted(object sender, ExecutedRoutedEventArgs e)
        {
            if (e.Command == ApplicationCommands.Paste)
            {
                e.Handled = true;
            }
        }
    }

In XAML, we reference the Text property for a button’s content. Note that we don’t need to specify text for the MenuItem–it will automatically get the text from the RoutedUICommand.

    <Window.CommandBindings>
        <CommandBinding Command="{x:Static loc:MainWindow.GreetUserCommand}" CanExecute="GreetUser_CanExecute" Executed="GreetUser_Executed"/>
    </Window.CommandBindings>

    <Window.ContextMenu>
        <ContextMenu>
            <MenuItem Command="{x:Static loc:MainWindow.GreetUserCommand}"/>
        </ContextMenu>
    </Window.ContextMenu>

    <StackPanel>
        <TextBox Name="txtSomeText" CommandManager.PreviewExecuted="txtSomeText_PreviewExecuted" Width="220" Height="25" Margin="10"/>
        <Button HorizontalAlignment="Center" Padding="10,5" Margin="10" Content="{Binding RelativeSource={RelativeSource Self}, Path=Command.Text}" Command="{x:Static loc:MainWindow.GreetUserCommand}"/>
    </StackPanel>

1096-001

#347 – How to Set Content Property for Button Based on Command

When you set the Command property of a MenuItem, the menu item automatically picks up a label from the command object, so you don’t need to set the menu item’s Header property.  Unfortunately, this doesn’t work for Button controls.

If you do want to set a Button control’s Content property based on the Text property of the associated command, you can do this in either XAML or code.

To set Content based on command in XAML:

        <Button Content="{Binding RelativeSource={RelativeSource Self}, Path=Command.Text}"
                Command="ApplicationCommands.Open"
                VerticalAlignment="Center" Padding="10,5" Margin="5"/>

To set the Content in code:

            btnOpen.Content = ApplicationCommands.Open.Text;

#346 – No Need to Set Header Property for MenuItem When Using Commands

If you use one of the preexisting RoutedUICommand objects for a WPF command, e.g. ApplicationCommands.Open, you’ll notice that the RoutedUICommand instance has a Text property.  This property in the command is used to set the label appearing on any MenuItem instances that have attached to the command by setting their Command property.  You don’t need to set the menu item’s Header property explicitly.

    <Window.ContextMenu>
        <ContextMenu>
            <MenuItem Command="ApplicationCommands.Open"/>
            <MenuItem Command="ApplicationCommands.Close"/>
            <MenuItem Command="ApplicationCommands.New"/>
        </ContextMenu>
    </Window.ContextMenu>


Notice that the text for each menu item is automatically filled in, since the text strings are defined in the RoutedUICommand object.  Also notice that some of the commands also define key gestures (e.g. Ctrl+O) for executing the command.