#1,214 – Naming Scheme for XAML Elements

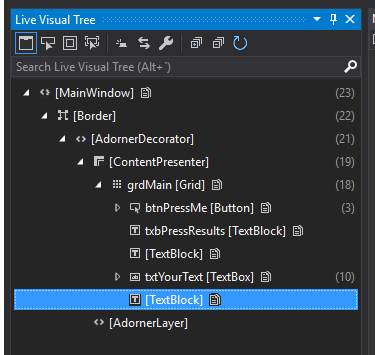
Although XAML elements do not require a name, it’s sometimes useful to name them for debugging purposes–e.g. when using Visual Studio’s Live Visual Tree.

Below is a modest proposal for a naming convention for various WPF controls.

  • AccessText – at
  • Border – brd
  • BulletDecorator – bd
  • Button – btn
  • Calendar – cal
  • Canvas – cnv
  • CheckBox – chk
  • ComboBox – cbo
  • ContextMenu – ctx
  • DataGrid – dg
  • DatePicker – dat
  • DockPanel – dp
  • Expander – exp
  • Frame – fr
  • Grid – grd
  • GridSplitter – gsp
  • GroupBox – grp
  • Hyperlink – hyp
  • Image – img
  • InkCanvas – ikc
  • InkPresenter – ikp
  • Label – lbl
  • ListBox – lb
  • ListView – lv
  • MediaElement – me
  • Menu – mnu
  • NavigationWindow – nw
  • Page – pg
  • Panel – pnl
  • PasswordBox pwd
  • Popup – pop
  • ProgressBar – pb
  • RadioButton rdo
  • ResizeGrip – rgr
  • RepeatButton rpt
  • RichTextBox – rtb
  • ScrollBar – sb
  • ScrollViewer – sv
  • Separator – sep
  • Slider – sli
  • StackPanel – sp
  • StatusBar – stb
  • TabControl – tab
  • TabItem – tbi
  • TextBlock – tb
  • TextBox – txt
  • Thumb – th
  • ToolBar – tbr
  • ToolTip – tt
  • TreeView – tv
  • Viewbox – vb
  • VirtualizingStackPanel – vsp
  • Window – win
  • WrapPanel – wp

You could certainly go too far in naming controls in a WPF application. Instead of naming every single control, it’s probably more sensible to name a subset of controls, providing names when it makes sense.

#1,213 – Why You May Want to Name XAML Elements

In the days of Win Forms, we had to name every user interface element because the name is how we referenced the element when setting initial properties and then working with the element from code-behind.

In WPF, most developers have (hopefully) trained themselves to not bother with naming elements. Ideally, all interaction with a control is done through the use of commands and data binding, which means that there is then no need to ever access a control from code-behind.

Having said that, there is one valid use case for naming XAML elements in WPF. When you use a debugging tool that shows you the visual tree of an application, it’s helpful to have your elements named, so you can figure out what’s what.

Below is a XAML fragment for a simple WPF application. Note that I’ve named some of the elements (I’m not bothering to name simple labels).

    <Grid x:Name="grdMain" Margin="10">
        <Grid.RowDefinitions>
            <RowDefinition Height="Auto"/>
            <RowDefinition Height="Auto"/>
            <RowDefinition/>
        </Grid.RowDefinitions>
        <Grid.ColumnDefinitions>
            <ColumnDefinition Width="Auto"/>
            <ColumnDefinition/>
        </Grid.ColumnDefinitions>

        <Button x:Name="btnPressMe" Grid.Row="0" Grid.Column="0" Margin="10" Command="local:SomeViewModel.PressMeCommand" Content="{Binding RelativeSource={RelativeSource Self}, Path=Command.Text}" Padding="10,5"/>
        <TextBlock x:Name="txbPressResults" Grid.Row="0" Grid.Column="1" Margin="10" Text="{Binding PressResults}"/>

        <TextBlock Grid.Row="1" Grid.Column="0" Text="Say something:"/>
        <TextBox x:Name="txtYourText" Grid.Row="1" Grid.Column="1" Text="{Binding YourText}"/>

        <TextBlock Grid.Row="2" Grid.ColumnSpan="2" Text="Gosh, I love this application"/>
    </Grid>

When I run the application, I can bring up Visual Studio’s Live Visual Tree and then explore the visual tree of the application. Notice the named elements in the visual tree, corresponding to the names given in the XAML.

Naming elements in this way can make debugging a bit easier when you’re navigating through the visual tree.