#1,196 – Making a Window Fully Transparent

You can make the background of a window fully transparent by setting its Background property to Transparent, settings AllowsTransparency to true and setting WindowStyle to None.

Below is an example.  Note that because WindowStyle is None, the window doesn’t have a normal border and we can’t therefore move the window around.

<Window x:Class="WpfApplication1.MainWindow"
        xmlns="http://schemas.microsoft.com/winfx/2006/xaml/presentation"
        xmlns:x="http://schemas.microsoft.com/winfx/2006/xaml"
        Title="Transparent"
        Height="190" Width="268"
        Background="Transparent"
        AllowsTransparency="True"
        WindowStyle="None"
        WindowStartupLocation="CenterScreen">

    <StackPanel>
        <TextBlock Text="Topper (1937) starred Cary Grant and Constance Bennett"
                   TextWrapping="Wrap"
               HorizontalAlignment="Center" Height="40" Margin="47,0"/>
        <Button Content="Ok, Got It"
                Padding="10,5" Margin="10"
                HorizontalAlignment="Center"
                Click="Button_Click"/>
    </StackPanel>
</Window>

Here’s the window in action. (We added a handler to the button’s Click event to close the window when clicked).

1196-001

#1,195 – Making a Window Partially Transparent

You can use an alpha value when setting a background color to make the background of a control partially transparent.  (E.g. Making a tooltip partially transparent).

You can make the background of a Window transparent, or partially transparent, by doing three things:

  • Set the Background to Transparent or use a background that is partially transparent
  • Set the AllowsTransparency property to true
  • Set the WindowStyle to None

The WindowStyle must be set to None when setting AllowsTransparency to true.

Here’s an example:

<Window x:Class="WpfApplication1.MainWindow"
        xmlns="http://schemas.microsoft.com/winfx/2006/xaml/presentation"
        xmlns:x="http://schemas.microsoft.com/winfx/2006/xaml"
        Title="Transparent"
        Height="190" Width="268"
        Background="#D5F0F0FF"
        AllowsTransparency="True"
        WindowStyle="None">

    <StackPanel>
        <Button Content="Click Me"
                Padding="10,5" Margin="10"
                HorizontalAlignment="Center"/>
    </StackPanel>
</Window>

We now get a window that doesn’t include a border (so we can’t move it), but whose background is partially transparent.  The controls within a transparent window are opaque and all work fine.

1195-001

#1,194 – DesiredSize of Child Elements Includes Margins

After the measure phase, during which a custom element calls the Measure method on each of its child elements, each child element will set its DesiredSize property to indicate how much space it wants.

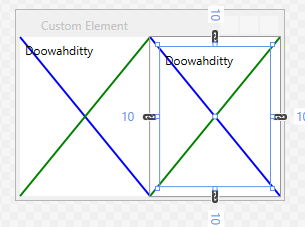
The DesiredSize of a child element accounts for any margins that have been set on that child.  Assume that we have the following XAML (MyElement is a custom element with a single child).

    <Grid>
        <Grid.ColumnDefinitions>
            <ColumnDefinition/>
            <ColumnDefinition/>
        </Grid.ColumnDefinitions>

        <loc:MyElement x:Name="Left">
            <loc:MyElement.Child>
                <Label Content="Doowahditty"/>
            </loc:MyElement.Child>
        </loc:MyElement>

        <loc:MyElement Grid.Column="1" x:Name="Right">
            <loc:MyElement.Child>
                <Label Content="Doowahditty" Margin="10"/>
            </loc:MyElement.Child>
        </loc:MyElement>
    </Grid>

We can see that the child element uses a margin.
1194-001

We can look at the value of the DesiredSize property after Measure has been called on the child element.  We can see that in the second case, the desired size is larger, indicating that the child wants to add a margin.

1194-002


#1,193 – MeasureOverride and Margins

During the measure phase, the MeasureOverride method is called on an element, indicating the size available to the control.  If a Margin has been set on the control, the available size passed in to MeasureOverride will have already been adjusted for that margin.

Below, we include two instances of MyElement in a Grid, setting a margin of 15 on the second element.

    <Grid>
        <Grid.ColumnDefinitions>
            <ColumnDefinition/>
            <ColumnDefinition/>
        </Grid.ColumnDefinitions>

        <loc:MyElement/>
        <loc:MyElement Grid.Column="1" Margin="15"/>
    </Grid>

At run-time, we see that the second element is smaller.
1193-001
If we instrument MyElement to report the value of the Size parameter that is passed to it, we see that MeasureOverride gets a smaller size passed in for the second instance.  The Size has been adjusted for a uniform margin of 15, subtracting 30 from both the width and the height.  (We see the same values passed in to ArrangeOverride).

1193-002