#917 – Changing Something when an Expander Is Expanded

You can use a trigger to change some property in an Expander whenever the Expander is expanded.  You set the trigger to react to a change in the IsExpanded property.

In the example below, we define a trigger that changes the border color for any expander that is expanded.

    <Window.Resources>
        <Style x:Key="changeColorOnExpanded" TargetType="Expander">
            <Setter Property="BorderBrush" Value="DarkGray"/>
            <Setter Property="Margin" Value="10,5"/>
            <Style.Triggers>
                <Trigger Property="IsExpanded" Value="True">
                    <Setter Property="BorderBrush" Value="Crimson"/>
                </Trigger>
            </Style.Triggers>
        </Style>
    </Window.Resources>

    <StackPanel>
        <Expander Style="{StaticResource changeColorOnExpanded}"
                  Header="Great Novels">
            <ScrollViewer>
                <StackPanel>
                    <TextBlock Text="Ulysses"/>
                    <TextBlock Text="The Great Gatsby"/>
                    <TextBlock Text="A Portrait of the Artist as a Young Man"/>
                    <TextBlock Text="Lolita"/>
                </StackPanel>
            </ScrollViewer>
        </Expander>
        <Expander Style="{StaticResource changeColorOnExpanded}"
                  Header="Funny Guys">
            <ScrollViewer>
                <StackPanel>
                    <TextBlock Text="Bill Murray"/>
                    <TextBlock Text="Eddie Murphy"/>
                    <TextBlock Text="Will Ferrell"/>
                    <TextBlock Text="John Cleese"/>
                </StackPanel>
            </ScrollViewer>
        </Expander>
    </StackPanel>

917-001

#916 – Scrolling Content within an Expander Control

The content of an Expander is shown when the control is expanded.  If you want to be able to scroll the contents of the Expander, you can set its content to a ScrollViewer, as shown below.

    <StackPanel Margin="5">
        <Expander BorderBrush="DarkGray"
                  Header="Expand Me"    >
            <ScrollViewer>
                <StackPanel>
                    <TextBlock Text="Ulysses"/>
                    <!-- bunch more items go here -->
                </StackPanel>
            </ScrollViewer>
        </Expander>
        <TextBlock Text="I'm below the Expander"/>
    </StackPanel>

The problem with this is that the Expander will normally expand to fit its content.

916-001

To be able to scroll the content of the Expander, you need to constrain its height.  You can do this by setting the MaxHeight property.

<Expander BorderBrush="DarkGray"
Header="Expand Me"
MaxHeight="150">

916-002


#915 – Delaying Generation of Expander Content

If you have a lot of content to display when an Expander is expanded and you want to delay loading of the content until the user actually opens the Expander, you can use the Expander’s Expanded event.

In the example below, the Expander contains a TextBlock, which we only load in the handler for the Expanded event.

        <Expander BorderBrush="DarkGray" Margin="0,5"
                  Header="Expand to See Something"
                  Expanded="Expander_Expanded">
            <TextBlock Name="txtInfo"/>
        </Expander>
        private void Expander_Expanded(object sender, RoutedEventArgs e)
        {
            txtInfo.Text = string.Format("You expanded me at {0}", DateTime.Now);
        }

When we run this example, the date/time displayed is the date/time that you expand the Expander.
915-001

#914 – Drawing a Border Around an Expander

You can make the boundaries of an Expander control more clear if you draw a border around the control.  The style for an Expander already has a Border element, though it is not visible by default.  You can make it visible by setting the BorderBrush and BorderThickness properties on the Expander.

        <Expander BorderBrush="DarkGray" Margin="0,5">
            <Expander.Header>
                <Image Source="CptBlood-1935.png" Width="51" Height="72"/>
            </Expander.Header>
            <Grid>
                <Grid.RowDefinitions>
                    <RowDefinition Height="Auto"/>
                    <RowDefinition Height="Auto"/>
                    <RowDefinition Height="Auto"/>
                    <RowDefinition Height="Auto"/>
                </Grid.RowDefinitions>
                <Grid.ColumnDefinitions>
                    <ColumnDefinition Width="Auto"/>
                    <ColumnDefinition/>
                </Grid.ColumnDefinitions>

                <Label Grid.Row="0" Grid.Column="0" Content="Title" FontWeight="Bold"/>
                <Label Grid.Row="0" Grid.Column="1" Content="Captain Blood"/>

                <Label Grid.Row="1" Grid.Column="0" Content="Year" FontWeight="Bold"/>
                <Label Grid.Row="1" Grid.Column="1" Content="1935"/>

                <Label Grid.Row="2" Grid.Column="0" Content="Director" FontWeight="Bold"/>
                <Label Grid.Row="2" Grid.Column="1" Content="Michael Curtiz"/>

                <Label Grid.Row="3" Grid.Column="0" Content="Star" FontWeight="Bold"/>
                <Label Grid.Row="3" Grid.Column="1" Content="Errol Flynn"/>
            </Grid>
        </Expander>

914-001
914-002

#913 – Changing the Direction that an Expander Expands

By default, an Expander control expands down, placing the content of the Expander below the header, when the control is expanded.

912-002

You can cause the Expander to expand in a different direction using the ExpandDirection property.  Valid values are Up, Down, Left or Right.

        <Expander ExpandDirection="Right">
            <Expander.Header>
                <Image Source="CptBlood-1935.png" Width="51" Height="72"/>
            </Expander.Header>
            <Grid>
                <Grid.RowDefinitions>
                    <RowDefinition Height="Auto"/>
                    <RowDefinition Height="Auto"/>
                    <RowDefinition Height="Auto"/>
                    <RowDefinition Height="Auto"/>
                </Grid.RowDefinitions>
                <Grid.ColumnDefinitions>
                    <ColumnDefinition Width="Auto"/>
                    <ColumnDefinition/>
                </Grid.ColumnDefinitions>

                <Label Grid.Row="0" Grid.Column="0" Content="Title" FontWeight="Bold"/>
                <Label Grid.Row="0" Grid.Column="1" Content="Captain Blood"/>

                <Label Grid.Row="1" Grid.Column="0" Content="Year" FontWeight="Bold"/>
                <Label Grid.Row="1" Grid.Column="1" Content="1935"/>

                <Label Grid.Row="2" Grid.Column="0" Content="Director" FontWeight="Bold"/>
                <Label Grid.Row="2" Grid.Column="1" Content="Michael Curtiz"/>

                <Label Grid.Row="3" Grid.Column="0" Content="Star" FontWeight="Bold"/>
                <Label Grid.Row="3" Grid.Column="1" Content="Errol Flynn"/>
            </Grid>
        </Expander>

913-001

#912 – Expanding an Expander Will Trigger Layout

When you expand an Expander control, you retrigger a layout operation.  The parent control then lays out the new Expander control, using the expanded portion.

In the example below, we put two Expander controls in a vertical StackPanel.  When we expand the first one, the StackPanel lays out its child controls again, such that the second Expander shifts down below the first.

912-001

912-002

#911 – Use ItemTemplate to Control Content on Tabs

You can use the ItemContainerStyle of a TabControl to dictate the content that appears on the tabs, creating a style that sets each TabItem’s HeaderTemplate.

As a slightly more straightforward way to do the same thing, you can just set the TabControl’s ItemTemplate property to a DataTemplate that defines the content for each tab.

        <TabControl Margin="5"
                    ItemsSource="{Binding RomanDudes}">
            <!-- Change ItemTemplate to control content on tabs -->
            <TabControl.ItemTemplate>
                <DataTemplate>
                    <StackPanel>
                        <Image Source="{Binding Image}" Height="50"/>
                        <TextBlock Text="{Binding Name}" HorizontalAlignment="Center"/>
                    </StackPanel>
                </DataTemplate>
            </TabControl.ItemTemplate>
            <!-- Change ContentTemplate to control main content -->
            <TabControl.ContentTemplate>
                <DataTemplate>
                    <StackPanel Orientation="Horizontal" VerticalAlignment="Top"
                                Margin="10">
                        <Image Source="{Binding Image}" Height="80"/>
                        <StackPanel Margin="10">
                            <TextBlock Text="{Binding Name}"/>
                            <TextBlock Text="{Binding ReignStart}"/>
                            <TextBlock Text="{Binding ReignEnd}"/>
                            <TextBlock Text="{Binding KnownFor}"/>
                        </StackPanel>
                    </StackPanel>
                </DataTemplate>
            </TabControl.ContentTemplate>
        </TabControl>

911-001

#910 – Using Data Binding to Control the Currently Selected Tab of a TabControl

In addition to using data binding to control the tabs that appear in a TabControl, you can use binding to control which tab is currently selected.

Below, we bind the SelectedIndex of a TabControl to a property in our class.  We do the same for a ComboBox, as well as binding the ItemSource of the ComboBox to the same collection that the TabControl is bound to.  After doing this, we can use the ComboBox to select the correct tab or manually select a different tab to cause the ComboBox to be updated.

        <TabControl Margin="5"
                    ItemsSource="{Binding RomanDudes}"
                    SelectedIndex="{Binding DudeIndex}">
        <!-- Templates here -->
        </TabControl>


        <ComboBox Grid.Row="1" HorizontalAlignment="Center" Margin="0,5"
                  ItemsSource="{Binding RomanDudes}"
                  SelectedIndex="{Binding DudeIndex}"/>

Property that we bind to:

        private int dudeIndex;
        public int DudeIndex
        {
            get { return dudeIndex; }
            set
            {
                if (value != dudeIndex)
                {
                    dudeIndex = value;
                    RaisePropertyChanged("DudeIndex");
                }
            }
        }

910-001

#909 – Binding a TabControl to a List of Objects, part III

You can bind a TabControl to a list of objects, which causes a new TabItem to be created for each element in the list.

By default, both the header and the content of each TabItem is set to the result of invoking ToString on each item in the collection.  You can set the Header of each tab by setting a HeaderTemplate.

You set the Content of each TabItem by setting the ContentTemplate property of the TabControl to a DataTemplate containing the desired items.

    <TabControl Margin="5"
                ItemsSource="{Binding RomanDudes}">
        <TabControl.ItemContainerStyle>
            <Style TargetType="TabItem">
                <Setter Property="HeaderTemplate">
                    <Setter.Value>
                        <DataTemplate>
                            <StackPanel>
                                <Image Source="{Binding Image}" Height="50"/>
                                <TextBlock Text="{Binding Name}" HorizontalAlignment="Center"/>
                            </StackPanel>
                        </DataTemplate>
                    </Setter.Value>
                </Setter>
            </Style>
        </TabControl.ItemContainerStyle>
        <TabControl.ContentTemplate>
            <DataTemplate>
                <StackPanel Orientation="Horizontal" VerticalAlignment="Top"
                            Margin="10">
                    <Image Source="{Binding Image}" Height="80"/>
                    <StackPanel Margin="10">
                        <TextBlock Text="{Binding Name}"/>
                        <TextBlock Text="{Binding ReignStart}"/>
                        <TextBlock Text="{Binding ReignEnd}"/>
                        <TextBlock Text="{Binding KnownFor}"/>
                    </StackPanel>
                </StackPanel>
            </DataTemplate>
        </TabControl.ContentTemplate>
    </TabControl>

909-001

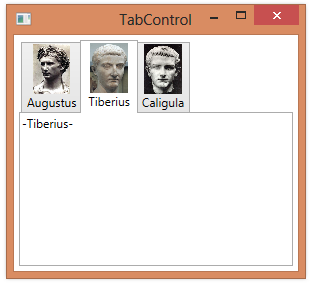
#908 – Binding a TabControl to a List of Objects, part II

To bind a TabControl to a list of objects, you can set the ItemsSource of the TabControl to an ObservableCollection of the desired object type.  This will cause a new TabItem to be created for each element in the collection.

By default, both the header and the content of each TabItem is set to the result of invoking ToString on each item in the collection.  To set the Header of each tab, dictating what appears on the tab itself, you can set the ItemContainerStyle of the TabControl to a style element, where you set the HeaderTemplate, as shown below.

<TabControl Margin="5"
            ItemsSource="{Binding RomanDudes}">
    <TabControl.ItemContainerStyle>
        <Style TargetType="TabItem">
            <Setter Property="HeaderTemplate">
                <Setter.Value>
                    <DataTemplate>
                        <StackPanel>
                            <Image Source="{Binding Image}" Height="50"/>
                            <TextBlock Text="{Binding Name}" HorizontalAlignment="Center"/>
                        </StackPanel>
                    </DataTemplate>
                </Setter.Value>
            </Setter>
        </Style>
    </TabControl.ItemContainerStyle>
</TabControl>

In the next post, we’ll set the content of each TabItem as well.
908-001


Note: For a cleaner way to do this, see: Use ItemTemplate to Control Content on Tabs